Showing posts with label Design Studio Conceptualisation. Show all posts

Wednesday, October 15, 2014

Design Studio Conceptualisation

Task 4

From the ideas of the previous task, we are required to pick any one of them to present it in the form of 2D,3D and 4D.

For my previous task, my idea during the progress was about using a string to make a bracelet.
As it a string,i was not a perfect material to be used for the modular system. As i am allowed to use materials that have been used for idea development, I have selected to use the string to present it in 2D,3D and 4D.

2D development images :


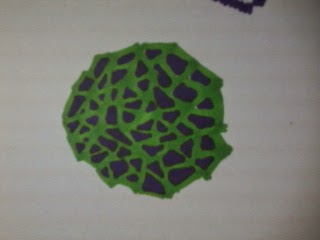
Device that being used for the 2D of the string is the Scanner. Scanning the material and exploring on the different effects. Moving the string around during the scanning process had made a unbelievable effect which is similar to a water ripple.

3D :


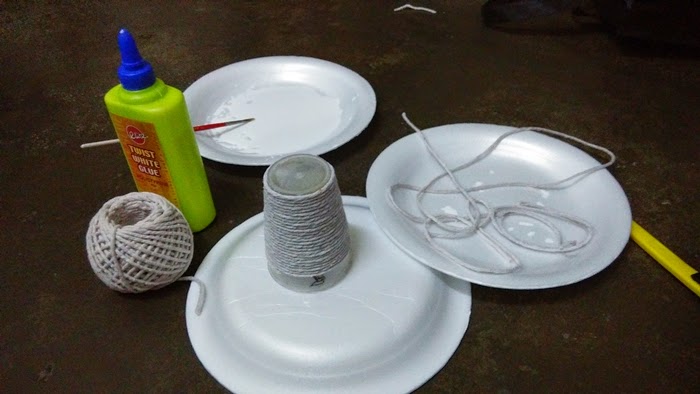
the string was twisted from bottom part of a cup to the top of the cup. After twisting the string, it was glued together to make a 3D form.


The dried strings are secured and strong in structure. The cup is removed after the glue is totally dried. The texture of string is perfect and it stands balanced and strong.

Other than the 3D, sound effect of the string (4D) were explore by recording the sound of the string when it swings. 
Recording:


Exploring on object in different dimension is to know better about the materials or object that we use in our daily life. Especially designers should acknowledged more on this.


Reflection:

This task was where i realise that an object can be presented at a minimum of three dimension which is in 2D, 3D, and 4D. This task reflected as how the Critical Thinking module reflected on some of the task  in it. All this form are interesting and to explore creativity of a person.


Thursday, September 4, 2014

Design Studio Conceptualisation

Task 3 

Modular System

Explore and design modular units that are flexible for arrangement.
(FORM-DEFORM) : Shape/ Design

a) For this task, what i understand is to Form a Shape or design bu using a selected object with the units more than one.

My understanding in this task is to make something that is nice to see in the spec of shape and design. My selection in this task is a Styrofoam plate.


What can a styrofoam form into?????

This was the question i ask myself before starting this task.....

I decided to cut the inner platform of the plate in circular shape, then cut some spaces to interlock 
other cut out of the Styrofoam plates. The reason why i use Styrofoam plate in this task is due to the flexibility of it and it is easy to carried from one place to another.


styrofoam plate fan

Since the shape of my Styrofoam design looks like a fan, and it works when the wind blows. Main point in this design is Form and Deform. My design could be assembled and disassembled as shown above. Besides, it could be flattened and deflattened. 


b) In this Task, another required to Explore and design using the same material used in previous task (Task 3.a.). For this task (b), the function is the main element to be focused on the design that is produced.

Initially, my design by using styrofoam plate in this task is a Photo Frame, which never satisfied me at all. And it looks like this :


styrofoam photo frame

After few days I were up to solve my problem in my living room where i face problems in placing letters and reminders in a secured place. Later on, i decided to make a Pocket Hanger which made of Styrofoam Plates. 


styrofoam plate paper pocket


During my progress in this task, i had some confusion in choosing a good material for my design.
According to Miss Tiffany's comment, i decided to keep going through in use of this Styrofoam Plate.

  • sketches that i have done to explore on how to put the styrofoam parts into something that might look nice or might be useful for our daily life.


Exploring and experimentation is very important in making an object or a design. A design will not just be perfect when applied directly on the material. Sketches are essential here to explore and develop ideas even greater and better. 

I have learnt so many things from this task. I have learnt that a designer should have alternative ways in solving or making this that helps around us.


Tuesday, August 5, 2014

Design Studio Conceptualisation


Task 1


"mark making"
 A term used to describe the different lines, patterns, and textures we create in an artwork. It applies to any art material we use on any surface, not only paint on canvas or pencil on paper. A dot made with a pencil, a line created with a pen, a swirl painted with a brush, these are all types of mark making. 


task :
making our own texture (mark making).


After my first experience in mark making,
mark making has become an interesting activity for me and i enjoyed mixing techniques and paints on papers. Each and every textures by making marks is magnificent. There are no texture which is not acceptable.


Reflection :
In this task of mark making, i have learnt to be more creative in selecting color and making shapes. This task helped me to reveal my creativity in making marks.


Sunday, July 13, 2014

Design Studio Conceptualization


Task 1
Power Tools

Review of preparation required by students to organize access to following resources (understanding of student about the requirments) :

Digital resources :
Computer,internet,software,printer,digital camera

-Computer is essential for the application of certain task by using softwares such as Creative Suite which contains : A.Illustrator, A.Premier, In Design ,etc
-Digital camera is for the use of capturing proves or presentation and to explore images.
-Print works are required to present works in paper and as references.

Analogue resources :
Workspaces, materials ,graphic tool box.
-suitable and tidy workplace to ensure that safety comes first in the working area.
-complete materials such as paper,scissors,knife,ruler,pens,pencils, markers, etc. is required in certain time.
-Graphic tool box is to carry equipment safely and to practice having things according to discipline.

Documentation :
Presentation ,storage,collation system,workbook-folio
-Presentation of work or assignment that given.Working in studio to practice future working environment.
- collecting and combining data by analysing it to perform or create a new ideas.
-having a sketchbook to practice sketching things and idea that might help in the future.
-making a portfolio to represent works in detailed and in perfection to be graded.